Developing, deploying and monitoring Lambda functions
In this post, we cover developing, deploying and monitoring serverless applications on the AWS cloud. We are also going to show how we can easily build serverless backends and expose them via REST APIs. Finally, we plan to have a look at monitoring these backends with CloudWatch, an AWS service.

In this post, we cover developing, deploying and monitoring serverless applications on the AWS cloud. We are also going to show how we can easily build serverless backends and expose them via REST APIs. Finally, we plan to have a look at monitoring these backends with CloudWatch, an AWS service.
With the growth of cloud computing and infrastructure management by various cloud providers/vendors, all we need to do in a serverless deployment is to provide the code/business logic, and every other step in the process is managed on our behalf. Now the question is, how does the architecture support this approach?
Check out also our previous post – The why and what of serverless technology.
Here at Qvik, we work on a variety of mobile backend solutions for industries across different verticals with Lambda functions on AWS. Our example architecture flow is therefore going to cover a common use case for a simple mobile backend solution. Now, let’s explore the components involved in spinning up a Lambda function. Here is a typical workflow for Lambda function triggers.
Say a user makes a request to a deployed Lambda function. The request goes through the AWS API gateway and hits and triggers a Lambda function, which then runs the code for us and returns a response. This is all there is to how Lambdas work on a high level. Later on, we will explore in more detail how all of these work, including setting everything up.

In this architecture, the API Gateway service is simply a fully managed AWS service that sits between your application and your AWS infra and ensures that your APIs are easy to publish, manage, deploy and monitor. It comes with lots of features including authentication, automatic security control, dashboard monitoring, caching, lower latency and so on.
In essence, the API gateway handles or manages all the processes involved in accepting requests from your application backend and ensuring that these requests are appropriately processed and responses returned to the calling client app. After the gateway has been set up, we can then call our functions when a request is made to our API endpoints.
AWS Lambda, on the other hand, also has lots of other ways to trigger HTTP events than simply responding to them. Lambda functions can currently be triggered from more than 200 AWS services, including running large data infrastructure setups and provisioning, enabling custom event triggers that run our code for us based on events, like a new object being created in an s3 bucket, and lots of other day-to-day decoupled services in our AWS stack.
Lambda function details
On the AWS platform, a function or handler is basically a resource that is triggered to run based on events. In essence, the serverless architecture is based on an event-driven model. What this means is that functions have to be manually configured via Lambda or in the console and are only triggered as events occur.
In this context, events are simply the metadata needed to process our function code. A simple example would be an HTTP call containing all the data in the right context needed to successfully make that request. An example Lambda function handler with the event, context and callback arguments is shown below:
const handlerFunction = (event, context, callback) => {
const response = {
statusCode: 200,
headers: {
'Access-Control-Allow-Origin': '*',
'Access-Control-Allow-Credentials': true,
},
body: JSON.stringify({ message: 'Hello Lambda!'}),
};
// callback handler
callback (error, result)
}
module.exports = handlerFunction;
In terms of function execution, Lambdas are run in an isolated environment that contains all needed resources and dependencies needed for the function to run to completion. As a note, Lambda functions have a default timeout period of 15 mins, which means that developers need to write optimized functions and ensure that responses are returned before the timeout period elapses.
On a high level, the serverless approach with Lambda functions is just a glorified and enhanced specification of the three-tier client-server architecture with special emphasis on the logic tier. It not only takes away all the boilerplate setup involved in building a traditional client-server model that is secure, highly scalable and highly available, but requires high maintenance.
Writing a basic Lambda function and understanding how to make it run
Since Lambda is an AWS compute service that runs based on a programmatic event source, it could also be used with other services in the AWS environment. However, when fronted by an API gateway, it works exactly like a regular web application that functions as a service based on client requests. In essence, when an HTTP request is made to an API, the API gateway invokes the handler, which then runs the function for us.
Now, let us set up the necessary architecture needed to run our first Lambda function. First, we need to understand that, in creating a Lambda function, we need to choose how it will be uploaded. This involves either working locally and uploading our code as a ZIP file to an s3 bucket or bundling the code in a container with all the dependencies needed for the code to run.
There are various options for deploying the functions, including the AWS serverless application model (SAM), cloud formation templates, the CLI, AWS CDK, the serverless framework and so on. For our exercise in this post, we are going to stick with the SAM.
We are going to build a basic backend API with the help of the AWS SAM deployment toolkit, a framework for building and deploying serverless applications on the AWS cloud. The SAM CLI would help us initialize, configure and locally build/run our serverless application and eventually deploy it to the AWS cloud. The other hard requirement is an AWS account with privileges needed to create and deploy Lambda functions.
To install the AWS SAM CLI on a Mac OS using Homebrew, we can run the following commands:
brew tap aws/tap

brew install aws-sam-cli
If you have an Apple Silicon CPU, check this link to the homebrew documentation to fix any issue you might encounter. After a successful installation, we can run `sam —version` to ensure we have the latest version of the CLI installed. As a side note, also install the docker needed for the local emulation of SAM running on the NodeJS 14.x runtime.

The next step after installing the SAM CLI is to run
sam init
followed by the prompt to select the default template starter and preferred runtime environment based on our use case. In this exercise, we will be selecting the serverless-API starter. Note that, based on your selections, you may only be able to write your code locally, save it as a ZIP file with all dependencies and upload it to the AWS environment; other options include containerizing the apps and pushing them via the AWS CLI.
What we mean is that we can either package the app in ZIP format or via the AWS CLI. The last step is to choose a project name and navigate to the source code in the code editor of your choice.

Note: To generate a configuration file for your pipeline to run via a CI/CD system that can deploy your serverless application on AWS SAM, you can run the command below:
sam pipeline init --bootstrap
The command above would bootstrap the steps needed to connect our resources for each deployment stage to easily create a pipeline config file on supported CI/CD systems like Gitlab, Jenkins, Bitbucket, Github actions and so on.
The SAM template represents the architecture of our serverless application. What we mean is that resources are defined here, including Lambdas, databases and the API gateway. The folder structure generated by running the sam init command is shown below:
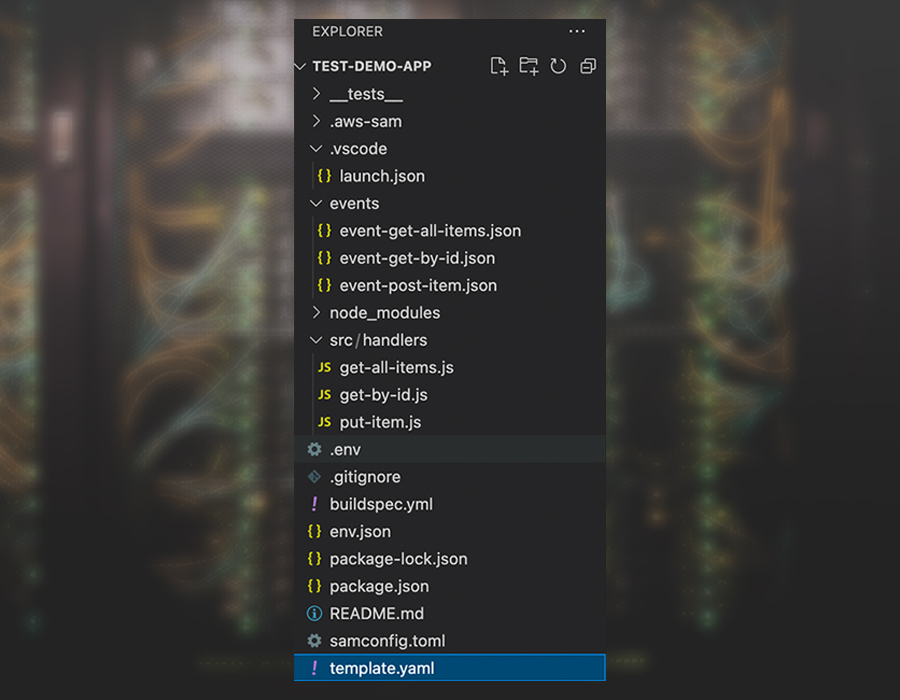
As we can see, we already have a standard boilerplate template needed to continue building our backend API. The `src/handler` folder contains all the Lambda functions representing different HTTP methods. We can navigate to `template.yaml` to understand what is happening there.
As an example, we can take a look at the Resource section, which declares the AWS resources we want to include in our stack. See the sample Lambda function resource below:
getAllItemsFunction:
Type: AWS::Serverless::Function
Properties:
Handler: src/handlers/get-all-items.getAllItemsHandler
Runtime: nodejs 14.x
Architectures:
- x86_64
MemorySize: 128
Timeout: 100
Description: A simple example includes a HTTP get method to get all items from a DynamoDB table.
Policies:
# Give Create/Read/Update/Delete Permissions to the SampleTable
- DynamoDBCrudPolicy:
TableName: !Ref SampleTable
Environment:
Variables:
# Make table name accessible as environment variable from function code during execution
SAMPLE_TABLE: !Ref sampleTable
Events:
Api:
Type: Api
Properties:
Path: /
Method: GET
As we can see, the Lambda function resource defines the storage layer needed for the request to be fulfilled, the HTTP method, the event trigger, the runtime, the timeout in milliseconds, the path to the handler function, the type and so on. Other resources defined in the template file include the database resource and the API gateway resource.
Generally, the `AWS::Serverless::Function` is responsible for creating a Lambda function and defining how that Lambda function should run by assigning the appropriate permissions for execution. On the other hand, the `AWS::Serverless::SimpleTable` creates a simple dynamo db table with a primary key useful for accessing the data. This means that we need to define a primary key when setting it up.
We can now proceed with building our application also with the `sam` CLI. We can do so by running:
sam build

After building our application successfully, we can now run `sam local invoke` to invoke our functions locally or `sam local start-api -t template.yaml –skip-pull-image` to invoke/mount our function ready for local testing on our machines. This command sort of mirrors our API gateway locally with hot-reloading enabled.

When we make an HTTP post request to add an item to the database, we get the following output shown locally on our terminal:

As we can see from the output above, we can see the duration of the Lambda function call, the memory size, the billed duration and so on. We have made use of the POSTMAN app to test our application. Note that we can also use curl on the command line.

Deploying our API with the SAM CLI
As the final step, it is now time to deploy our application to the AWS cloud so that we can get the API Gateway URL, which we can now use to make requests to our backend API, hosted as Lambda functions.
To deploy, all we need to do is run the `sam deploy –guided` command which takes us through the steps needed to deploy our application to AWS cloud. Note that the `sam` deploy command makes use of AWS Cloudformation to package our code as a ZIP archive based on the template file in the project root dir and then pushes the artifact to an s3 bucket. It then returns an output file containing the s3 location for the artifact. We also get the API Gateway endpoint URL from the Cloudformation outputs.

We can test our API on POSTMAN with the API Gateway endpoint URL as shown in the image above.

As we can see, all the infrastructure needed to make our application run is managed for us in this setup, and all we need to do is write our code and set up deployment pipelines. The other major step involves provisioning the resources we need for our application to run, including the storage layer, caching layer, API gateway and so on. And as mentioned before, we can also go ahead and set up a build pipeline for our application based on the buidspec.yml file in the root of our project directory as well, but we will leave that as an exercise for the reader.
As a side note, AWS Lambdas can now be configured for deployment sizes of up to 10GB, including container image sizes (if your set up is EKS based), useful for supporting builds and deployments with larger workloads.It also supports 10GB RAM, which is equivalent to 6vCPUs. More details on the container image sizes can be found here.
Monitoring our application with CloudWatch and Sam CLI
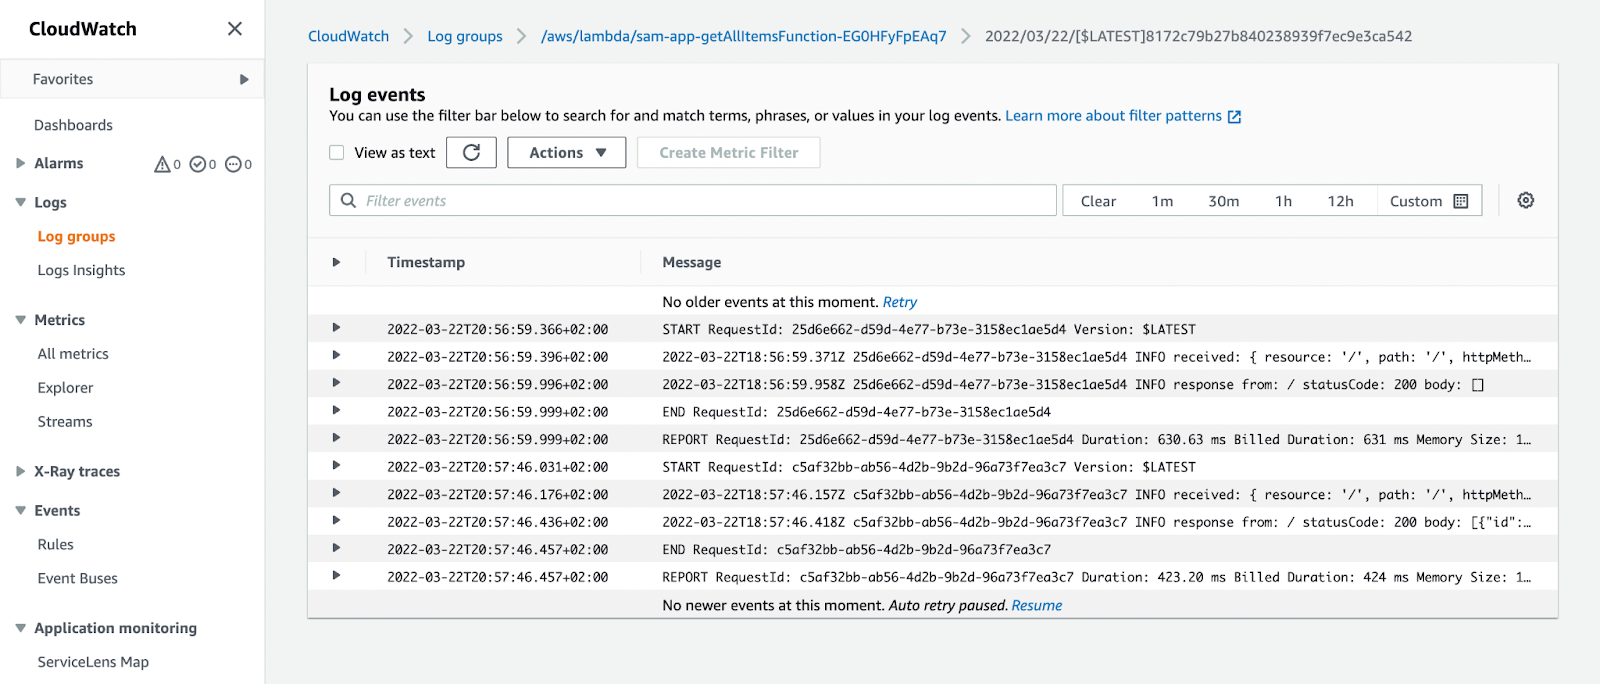
As final due diligence, we can easily monitor and observe our serverless functions on the CloudWatch dashboard based on the requests and logs from our application API gateway. Now, let us check CloudWatch on our console, where we can see the function triggers and logs. See the figure below:
Additionally, the `sam` cli also comes with quick and easy logging for our Lambda functions simply by running `sam logs`. For more information on logging with specific filters, please check the documentation.
Conclusion
The highlight of serverless is that we do not have to manage or set up any form of infrastructure in the traditional sense, where we had to provision databases, compute/instances, clusters and so on. In this setup using pre-defined configurations and self-managed tools and services, we can easily deploy our application code as individual functions that can be run in isolated instances.
It is our hope that this two-part post about serverless on AWS has given you an idea about the whats and the whys of serverless architecture and about developing, deploying and monitoring serverless applications.
Thanks again for reading!