Our take on App Clips? Interesting business opportunities and technical limitations.
In this year’s WWDC, one new iOS14 feature shone brighter than the rest: App Clips.

In this year’s WWDC, one new iOS14 feature shone brighter than the rest: App Clips.
Briefly, an App Clip is a lightweight version of your app that offers users some of its functionality when and where they need it. That means any iPhone user can use a part of your app without downloading the whole thing: you decide which screen(s) you want to use in App Clips.
If the user likes your App Clip experience, they can download the whole app from the App Clip. Sound familiar? It should, as Android’s Instant Apps provide a similar functionality.
Since App Clips are closely integrated with ApplePay, you may not even need to handle all transactions through ApplePay. In other words, App Clips makes new apps fast and easy to discover.
How to benefit from using App Clips for your application?
One major benefit is improved discoverability. People can discover and launch App Clips in a variety of ways and contexts and complete tasks inside apps within seconds. When used right, they make businesses more accessible.
You can launch your App Clips in a physical location by simply scanning a QR code, an NFC tag or a visual code provided by Apple (will be introduced soon). App Clips can be launched from Siri suggestions, smart banners at the top of the mobile web site, or the Maps app. They are also easy to share as a link in any message app.
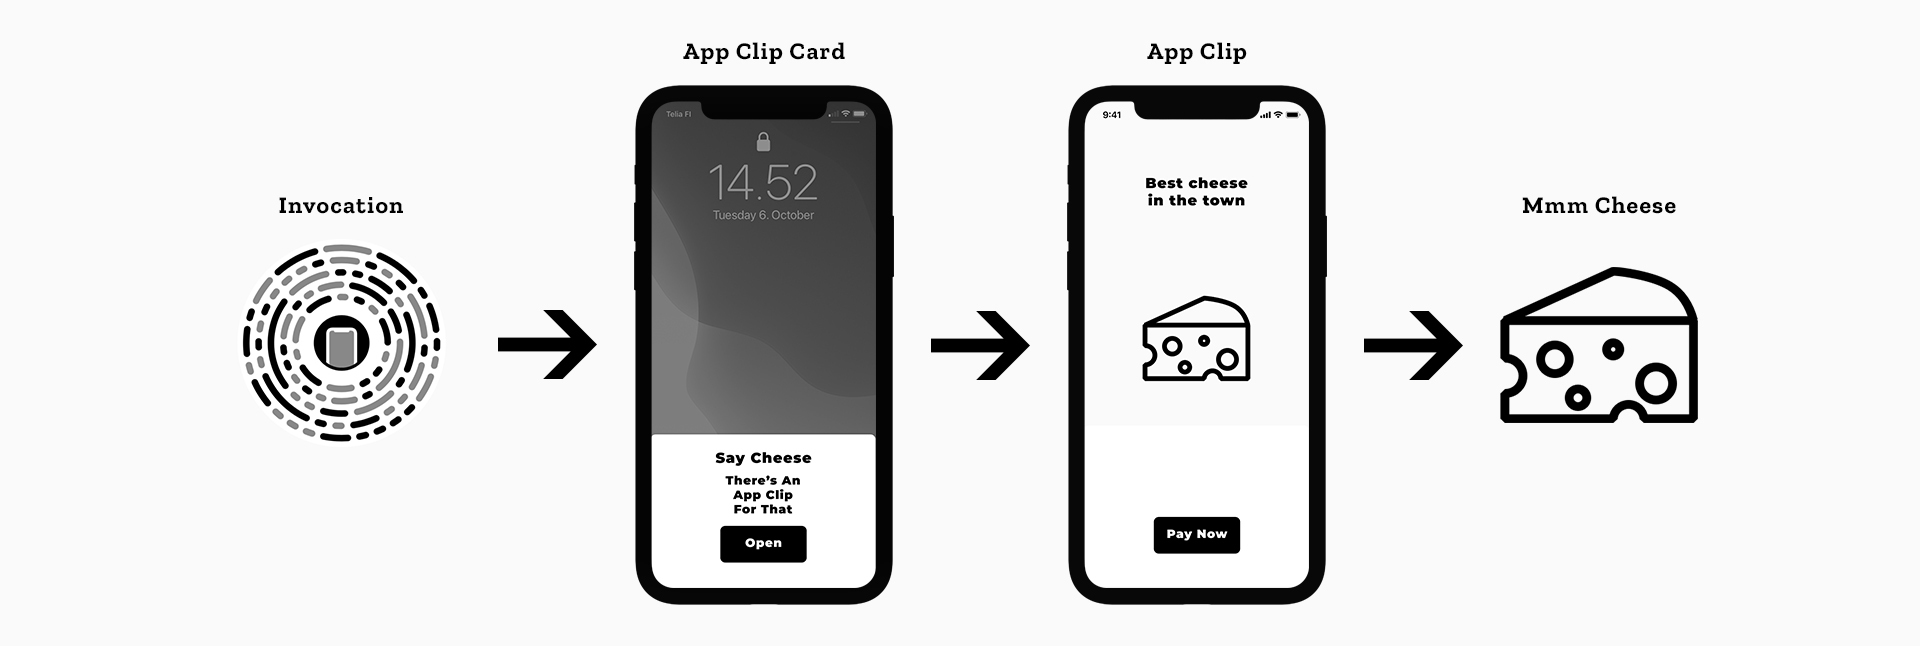
In a cheese store, your App Clip could look like this.
One concrete example would be a user booking something through your website. They get an invoice or ticket to verify their order or appointment. The user could then download the App Clip and show the verification screen simply by tapping the SMS or email link at the counter.
Using App Clip notifications to interact with users
Hassle-free interaction with users is a major benefit of using App Clips, which provide the option to schedule notifications for up to 8 hours after launch.
For example, consider you have a restaurant app that allows users to order food. By sending notifications, the App Clip can show the user more details about upcoming deliveries, like showing the delivery time or the courier’s location on the map.
App Clips can be launched when you’re paying for your drink in a coffee shop, or in a museum to claim your ticket, or when buying a plane ticket at the airport.
You can also use App Clips notifications for businesses with multiple outlets. For instance, a restaurant chain could show different menus, delivery times and contact details for its individual restaurants. When sending a notification, iOS only needs to know which restaurant is which so that the system can route the correct one.
As a result, the system requires notification payloads to contain a URL as the target content identifier. The following code shows the notification payload for an App Clip that serves multiple businesses:
{
    "aps" : {
       "alert" : {
       "title" : "Merchant Status",
       "subtitle" : "Restaurant A",
       "body" : "Your order is ready."
       },
    "category" : "order_status",
    "target-content-id" : "https://example.com/restaurants/restaurant_a/order/1234"
    }
}
The value for the target-content-id must be a URL that matches a corresponding advanced App Clip experience defined in the App Store’s App Clips section.
Not everything is possible
There are technical limitations you need to consider. These limitations protect users’ privacy – for example, App Clips can’t perform background operations. Some limitations are there to make sure that the App Clip stays light and quick to use. So one big bottleneck is the limited 10 MB size of the App Clip.
An App Clip is run when needed and will be deleted from local storage if it’s not used again after a period of inactivity. Neither are App Clips included in iOS backups. Access to personal information, such as health and fitness APIs, is limited.
App Clips can only be launched by the user, or in response to an App Clip URL. Universal Links, document types and URL schemes are unavailable.
Implementation details
You can integrate App Clips to an existing project. Create a new target as you would for other targets, such as keyboard extension, or share extensions. In order to prevent confusion, an App Clip is not an app – it is more like an extension of your existing app. In other words, you have to have an app before you can create an App Clip.
After creating the App Clip’s target for your project, select the target and navigate to the Signing & Capabilities section. You need to add Associated Domains for your App Clip. This has the same setup as Universal Links, so you basically define the URL which is going to trigger an app clip when the user taps a link.
Our ten technical findings
1. App Clips has to be less than 10 MB after thinning. Since App Clips are designed to be a fast, in-the-moment experience, they should only include the bare minimum of content to keep the download fast.
When you share your assets (images, PDFs, sounds or other content embedded into a bundle), you may want to create an additional asset catalog just for App Clips.
2. The App Store imposes some limitations on the content of App Clips. The maximum title length is 18 characters and subtitle length 43 characters. The maximum image size is 3000x2000px for aspect ratio 3:2 formats. Only PNG/JPG images are allowed, no GIFs or transparent images. Because of these limitations, it would be beneficial for your business to choose cover photos and titles that describe the experience accurately.
3. The definition must be “appclips:”, not “appclip” – even if you only have one App Clip. This seems to be confusing people on Twitter, so long story short, always write it like this:
appclips:mybusiness.fi
4. The App Clip and host app have to have different bundle IDs. The host app is identified as Parent Application Identifiers Entitlement. For example, your app has to have a bundle identifier which is usually (com.domain.AppName). So your App Clip consists of your bundle ID plus the .Clip extension, or (com.domain.AppName.Clip). The .Clip suffix is not mandatory but is good practice to include.
5. You must configure your web server to enable the system to verify your App Clip’s authenticity (Apple App Site Association).
6. In order to invoke an App Clip from outside (link on a website, in a text message, etc.), you need to have “App Clip Experience” defined in App Store Connect. It’s a custom URL that tells the system (iOS) to open the App Clip. You also need to add additional metadata information to the Experience, such as the cover photo, title, description and action.
If you want to extend the App Clip Experience to other businesses or enable integrations such as Maps, NFC or location, you may need to add additional information by simply tapping “Edit Advanced Experiences”.
7. For sharing code between the app and App Clip, it is better to use a modular codebase architecture and assets catalog in order to enable easy use of the App Clip target. If not, the developer has to mark all the classes and resources as shared with the App Clip target.
8. On the app side, the developer has to add an associated domains entitlement and handle the URL app delegate or scene delegate or environment variable from the NSUserActivity class.
9. On the web server, the developer has to add an “apple-app-site-assoication” file or update it if one has already been created for universal links.
{
    {
    “appclips”: {
         “Apps”: [“APPSTOREID.com.qvik.sample.Clip”]
    }
}
When you have done all this, you have to upload the App Clips and host app to the App Store for review. App Clips are reviewed according to the same guidelines as normal apps.
You should now see a new tab named App Clip. In there, you can add a cover photo and subtitle for the clip. With Advanced Settings, you can associate Maps, NFC tags and more with your App Clip.
After adding metadata to the clip, you must specify an App Clip Experience URL that will lead users directly to your App Clip content.
10. If you want to use some part of your implementation only with the App Clip, you may want to add some additional settings under Active Compilation Conditions in your app target build settings. Adding an “APPCLIP” macro for debug and release under the Swift Compiler – Custom Flags would allow you to share some of the functionality with the App Clip.
You can then share functionalities using that macro in your code. Like this:
#if !APPCLIP
// Code you don't want to use in your App Clip.
#else
// Code your App Clip is allowed to access.
#endif
App Clips will definitely change the app scene, and we can’t wait to really go to town with them. If you want to discuss the potential business solutions in more detail, our Pia Höglund is the person to talk to!